A mobile-first lifestyle has become a core necessity in today’s society and continues to grow each year. This trend is evident in the rapid increase in smartphone usage, especially Android devices. According to Kompas, the number of mobile phone users worldwide surpassed 5 billion in September 2021. As a result, Android applications have become an essential tool for businesses. Business owners are now expected to have Android apps to reach a broader and more competitive market.
Despite this demand, building an online Android application often requires a significant budget. Costs typically include servers, technical staff, and ongoing development expenses. These high costs frequently discourage business owners from expanding into the mobile industry. Learning how to create an APK independently can cost tens to hundreds of millions of rupiah. This is unfortunate, as an Android-based online store app has strong potential to attract customers and increase sales.
Jagel.id was created to help business owners grow their businesses more easily in the digital space. Through Jagel.id, users can build their own Android applications at an affordable price. The platform supports various app types, including online stores, ride-hailing services, company profiles, portfolios, online catalogs, and other e-commerce solutions. Once completed, these applications can be uploaded to the Google Play Store to reach a wider audience.
Jagel offers affordable subscription plans starting at approximately USD 6 to USD 32 per month, making it accessible for small businesses and entrepreneurs who want to build Android apps without high development costs.
Learn How to Create Your Own APK
Building an Android application with Jagel.id is simple, fast, and budget-friendly. This is why Jagel.id is the right choice for anyone who wants to create their own Android app without technical complexity.
For first-time users, the app creation process may seem confusing. In this tutorial, we will guide you step by step on how to create an Android application using the Jagel.id mobile app. Make sure you have downloaded the Jagel.id app from the Google Play Store before starting.
Install the Jagel.id App from the Play Store
Download and install the Jagel.id app from Google Play to begin the app creation process.
Create Your Own Android Application
Start by registering an account so you can begin building your application. Enter your personal information correctly, then complete the registration process. Once registered, you will be directed to the app creation page, where you can select a template provided by Jagel.
Jagel offers seven template options: Online Transportation, Massage Services, PPOB, Reservation Services, Restaurants, Online Stores, and Business Profiles. Choosing a template helps you better understand the app-building flow.
After selecting a template, enter your application name, app code, and upload an app icon. You can save the project and make further adjustments later using the app editor.
On the My App page, you will find a guide banner for new users. This guide walks you through several important steps, starting with account verification. Verify your email address by requesting a confirmation email and clicking the verification link. If the email does not appear in your inbox, check your spam folder.
Next, verify your phone number by requesting an OTP code and entering it in the verification form. After that, proceed with ID verification by uploading a clear photo of your ID card and recording a short face verification video in a well-lit environment. Enter your national ID number and full name exactly as shown on the ID card, then submit the verification request and wait for approval.
Activate Free Trial Access
Once verification is complete, activate the Bronze free trial, followed by the Platinum free trial. This will give you full access to all Jagel features for 14 days at no cost.
Edit and Customize Your App
With full access enabled, you can begin customizing your application. Start by changing the layout through the app editor. Save your changes, then proceed to manage menus by adding new menu items such as text content or other features needed for your app.
Next, customize the color scheme by adjusting background colors, text colors, and icons to match your brand identity.
Preview and Generate Your APK
Before generating the final app file, preview your application to ensure everything looks correct. If the preview meets your expectations, proceed to generate the application.
Jagel provides two output formats:
- APK, which can be installed directly on Android devices
- AAB, which is required for uploading apps to the Google Play Store
Once the app is ready, you will receive a notification from the admin. You can download the file from the My App page.
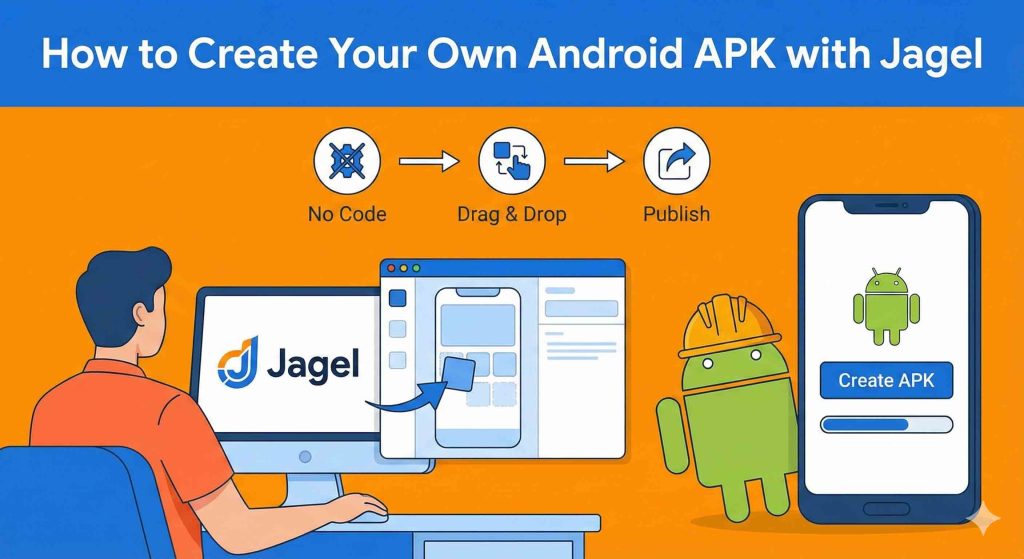
Step by Step to Create Android App Without Coding
Install the Jagel.id App on the Play Store
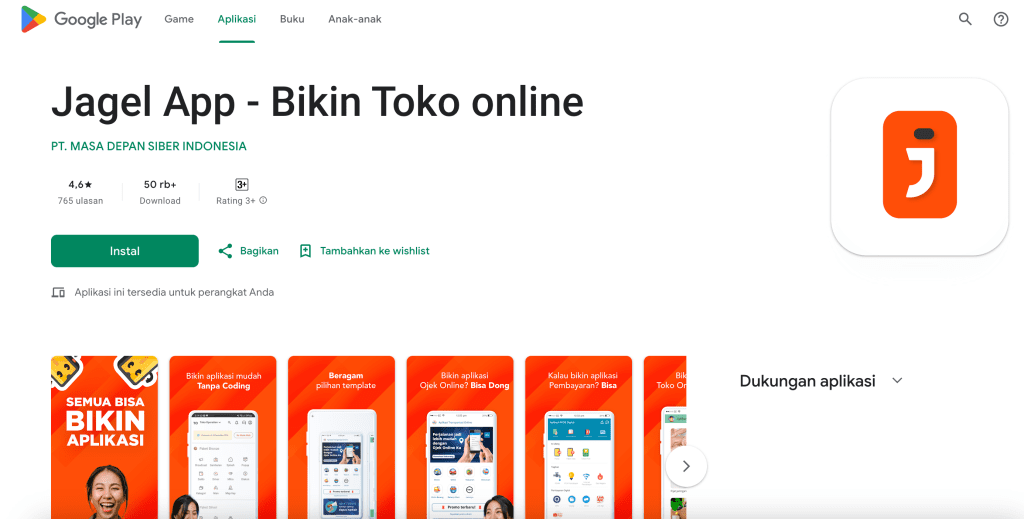
Figure 1
Click the following link: Download Jagel.id App to be redirected to Google Play and install the Jagel app.
Create Your Own Android Application
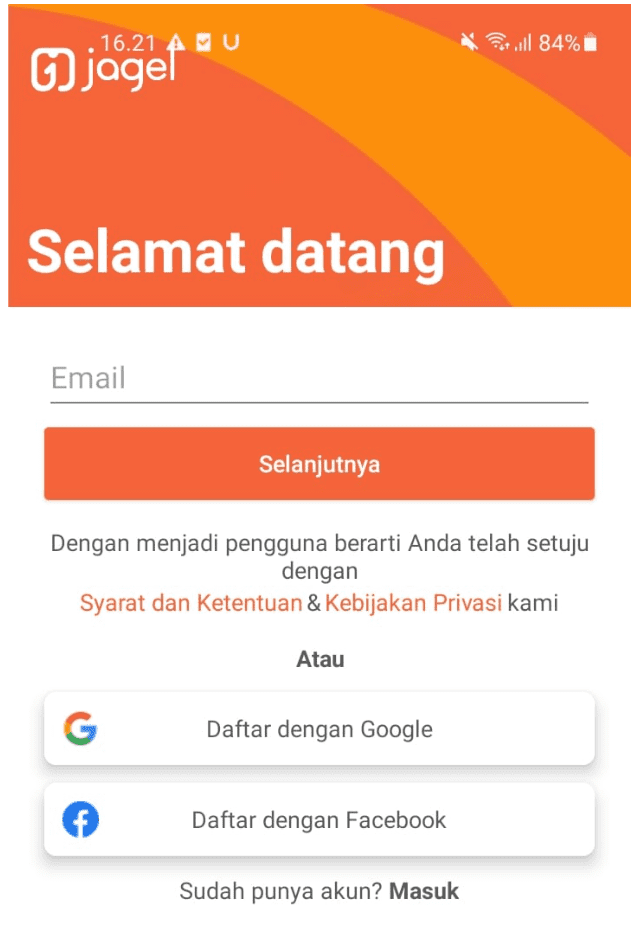
Figure 2
Register first so you can start creating an application.
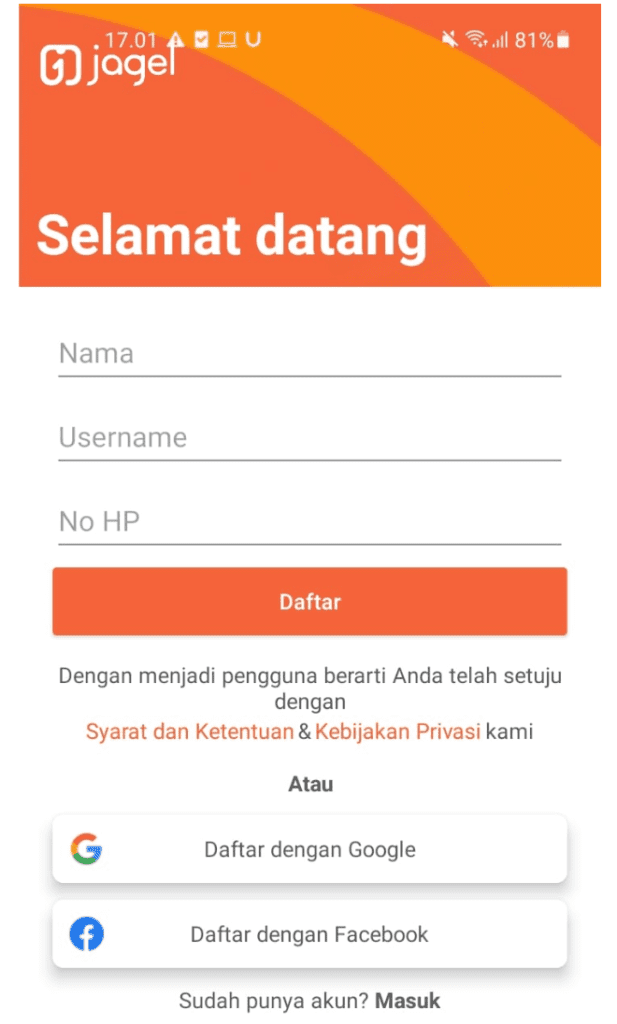
Figure 3
Enter your correct personal information, then tap the [Register] button.
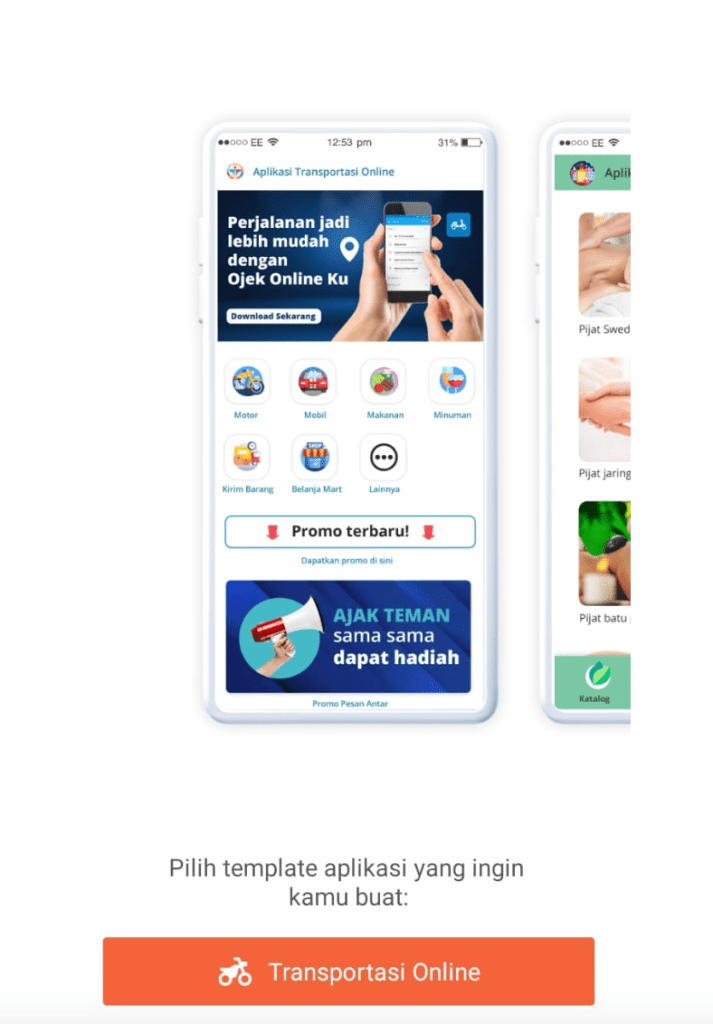
Figure 4
After successful registration, you will be directed to start creating your application by selecting one of the templates provided by Jagel.
Before starting the process of creating your own APK on Jagel, you can choose a template to help you better understand the app-building process.
Note: Jagel provides 7 template options:
Online Transportation, Massage Services, PPOB, Reservation Services, Restaurants, Online Stores, and Business Profiles.
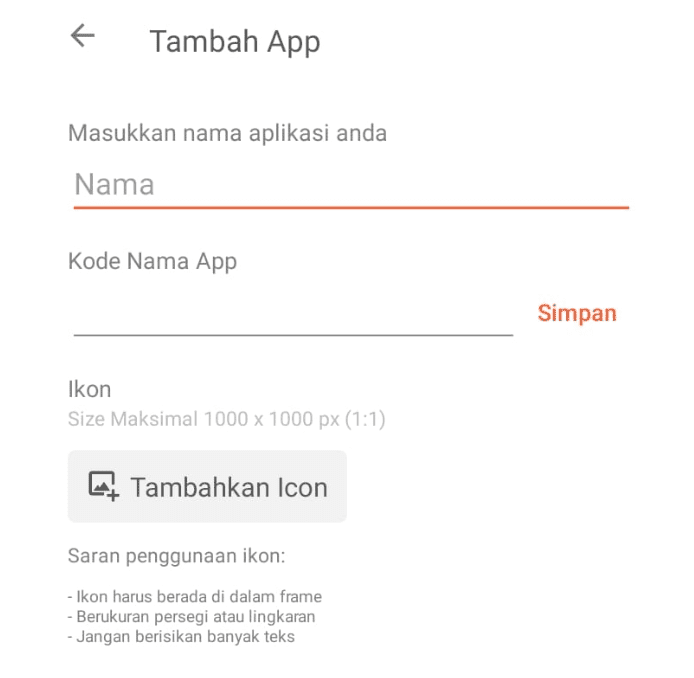
Figure 5
Enter the app name, app code, and app icon.
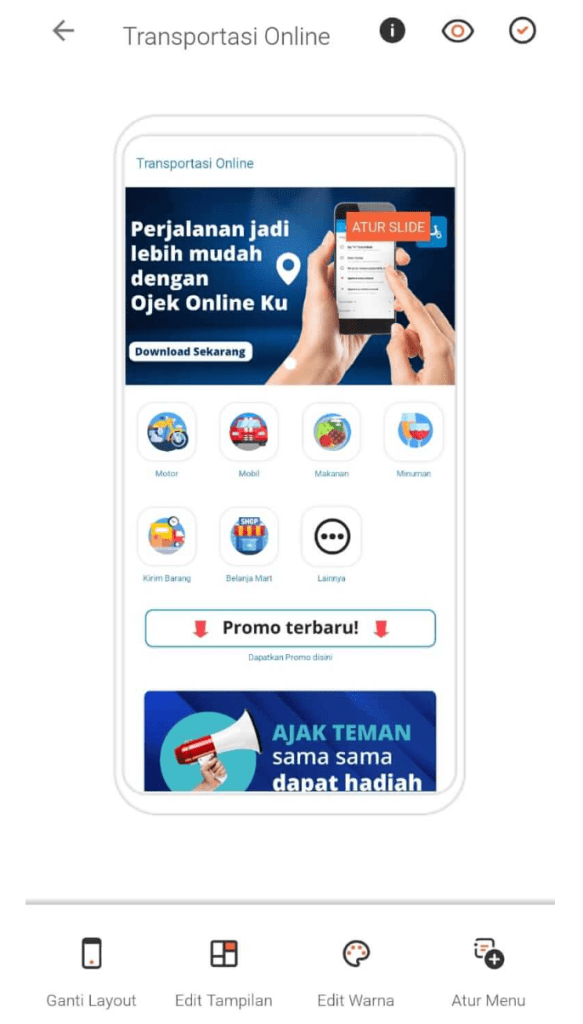
Figure 6
On the app editor page, you can tap Save first and configure the app later.
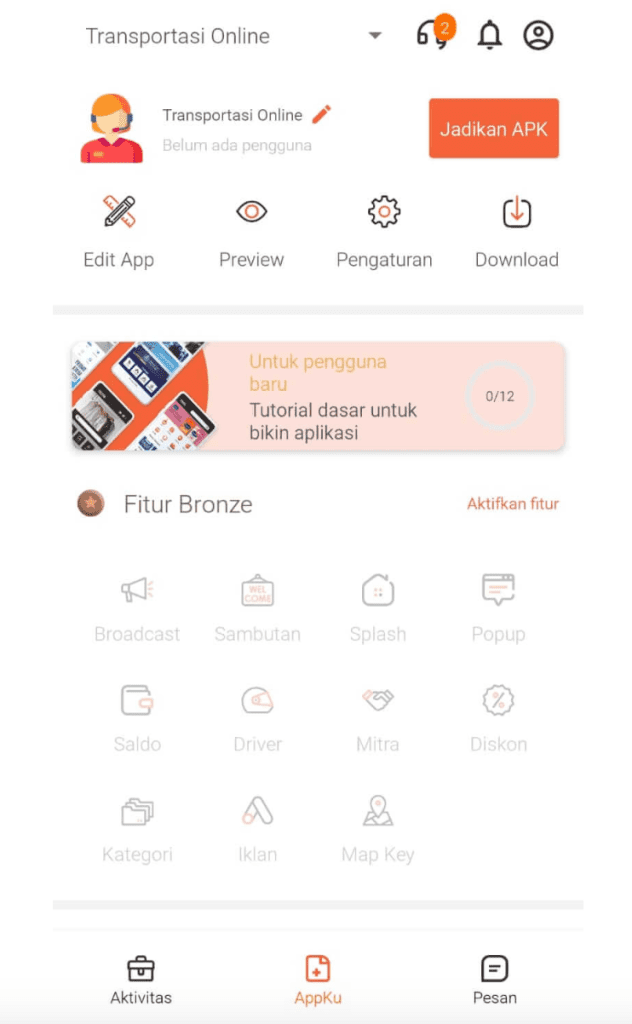
Figure 7
On the My App page, tap the banner to view the new user guide.
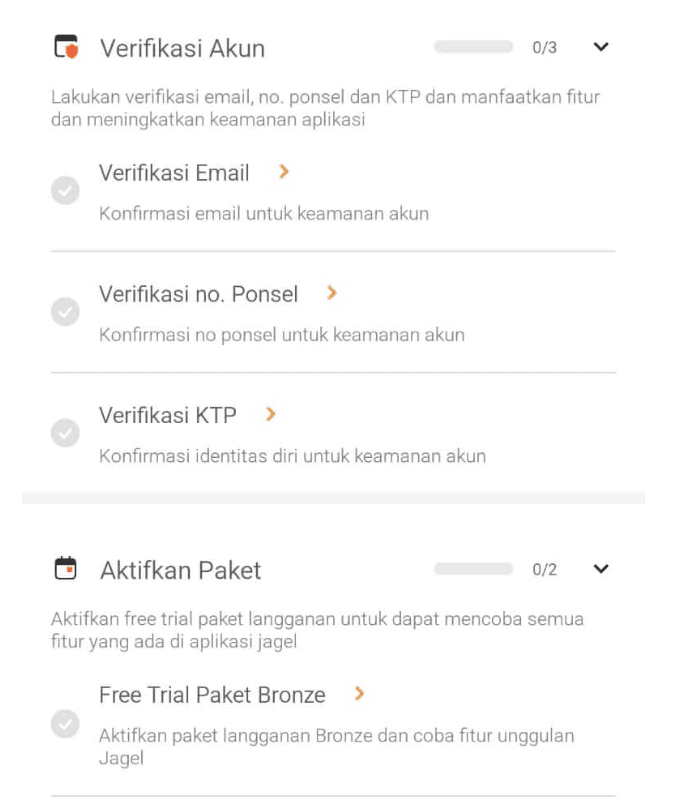
Figure 8
Several steps will appear to help new users fully utilize Jagel’s features. The first step is account verification—tap the Email Verification button.
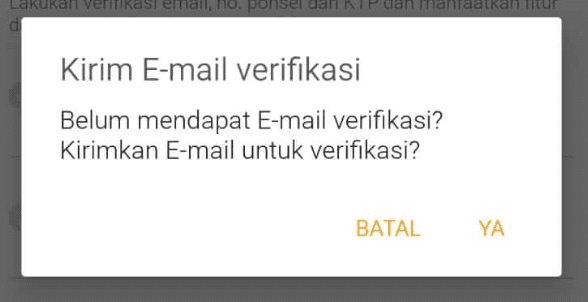
Figure 9
Tap Yes to allow the system to send a confirmation email.
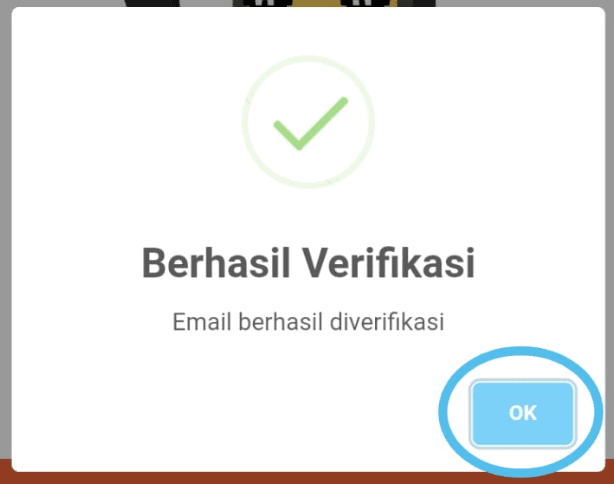
Figure 10
Open your email and check your inbox. If you don’t see it, check your SPAM folder. Click the link in the email, and you will be redirected to the Jagel website with a popup confirming that email verification was successful.
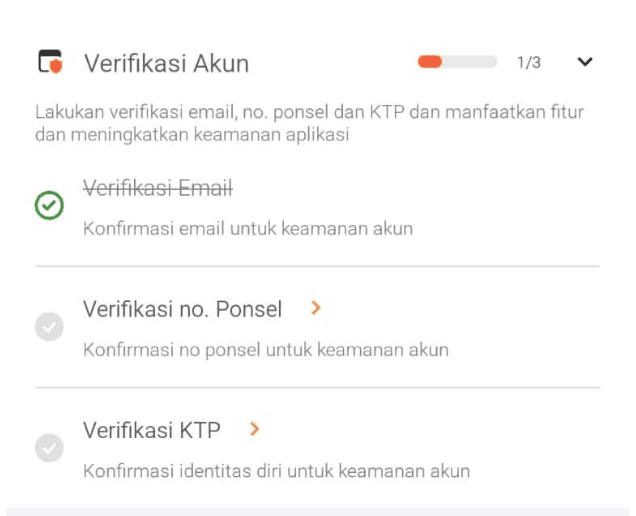
Figure 11
Return to the app. Email verification is now complete, marked with a strikethrough. Next, tap Phone Number Verification.

Figure 12
Make sure your phone number is correct, then tap Yes to send the OTP code. Wait for the OTP and enter it on the phone number verification page.
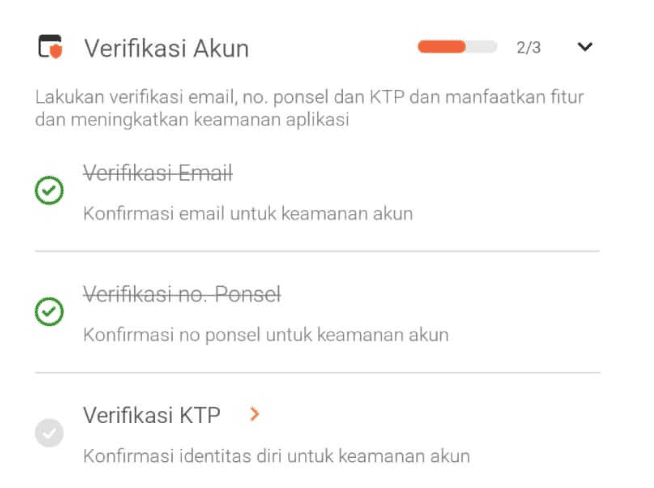
Figure 13
Return to the new user guide and proceed with ID (KTP) verification.
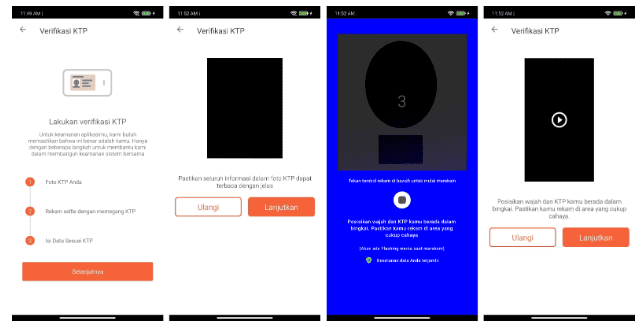
Figure 14.1
For ID verification, prepare your ID card and make sure you are in a well-lit area to help our team verify your identity. The first step requires taking a photo of your ID card, followed by recording a video of your face holding the ID card (a colored flash will appear during the video).
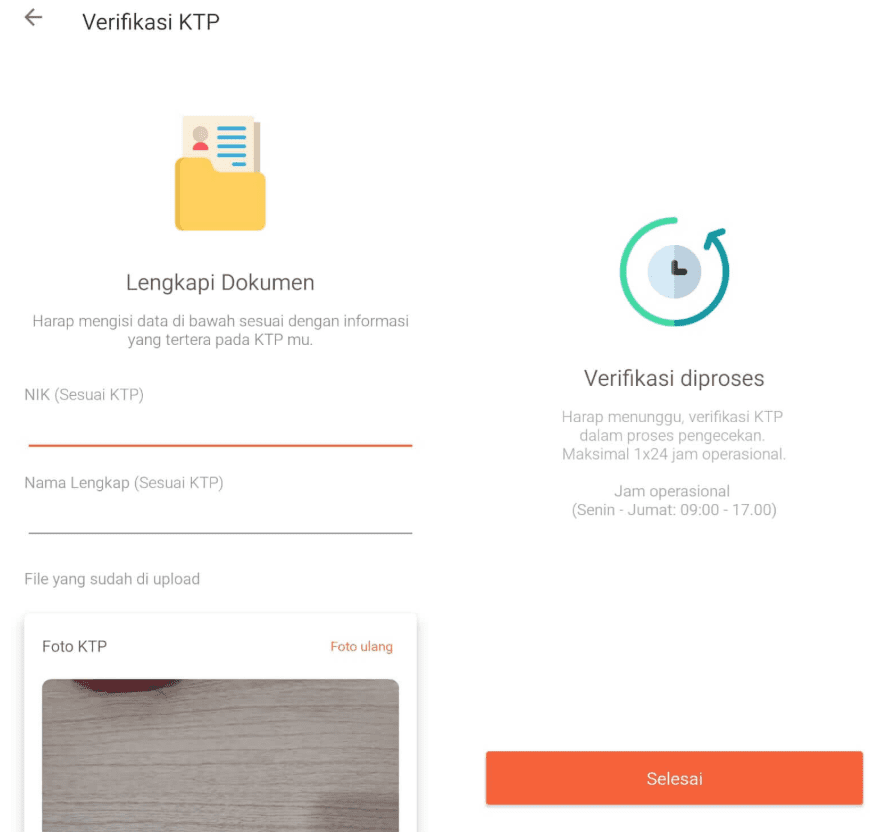
Figure 15.2
In the final step, enter your National ID Number (NIK) and your full name as shown on the ID card. Make sure the ID photo and video are clear before tapping [Submit]. Then, wait for the verification process to be approved.
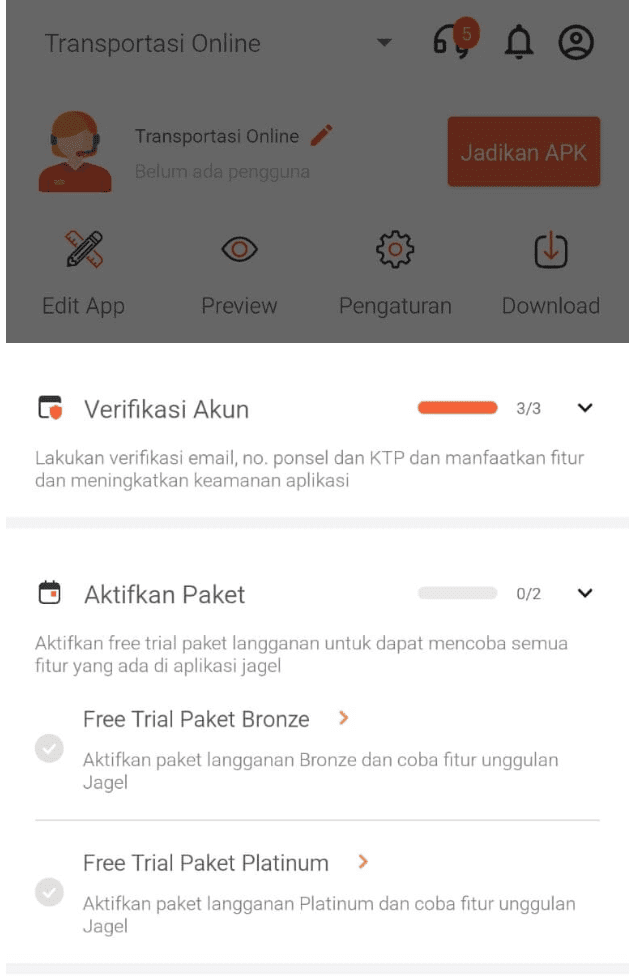
Figure 16
Next, activate the Bronze free trial.
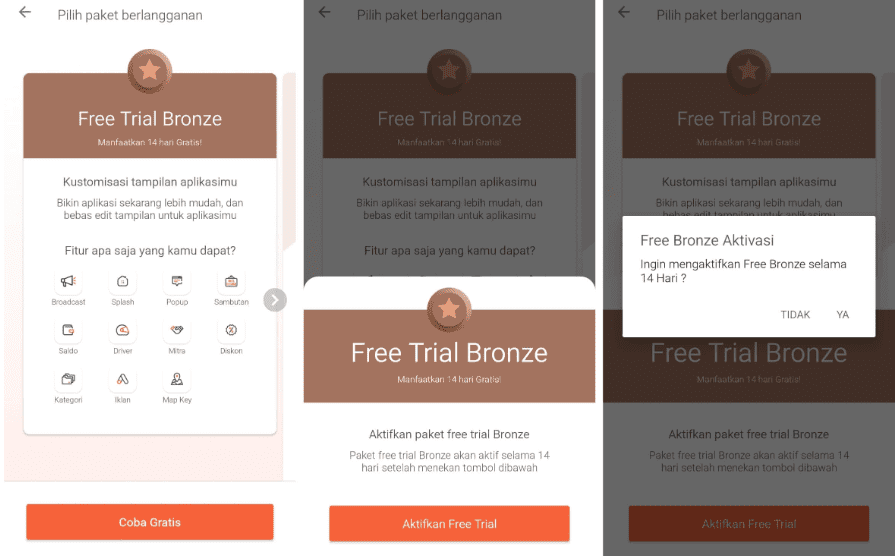
Figure 17
Tap [Try Free], then [Activate Free Trial], and finally Yes to confirm the Bronze free trial.
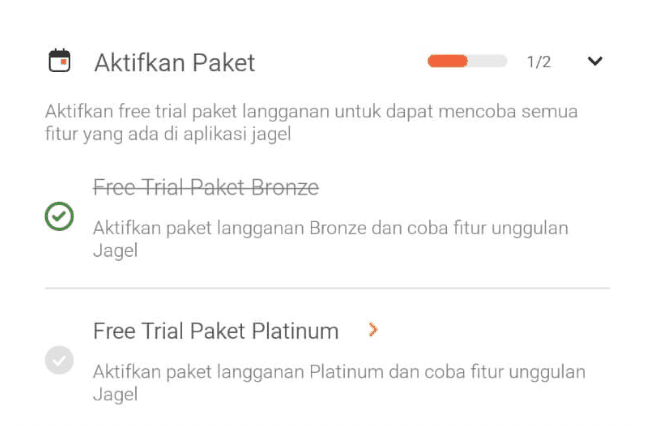
Figure 18
Return to My App, open the guide, and select the Platinum free trial.
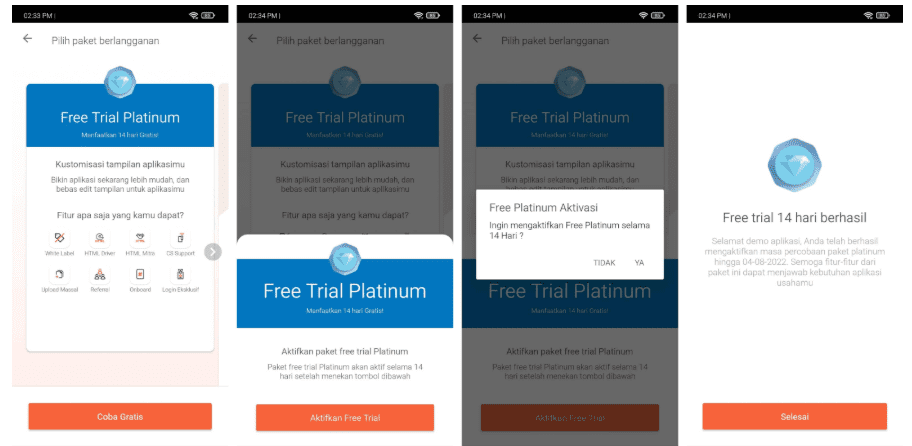
Figure 19
Tap [Try Free], then [Activate Free Trial], and finally Yes to confirm the Platinum free trial. You now have access to all Jagel features for 14 days at no cost.
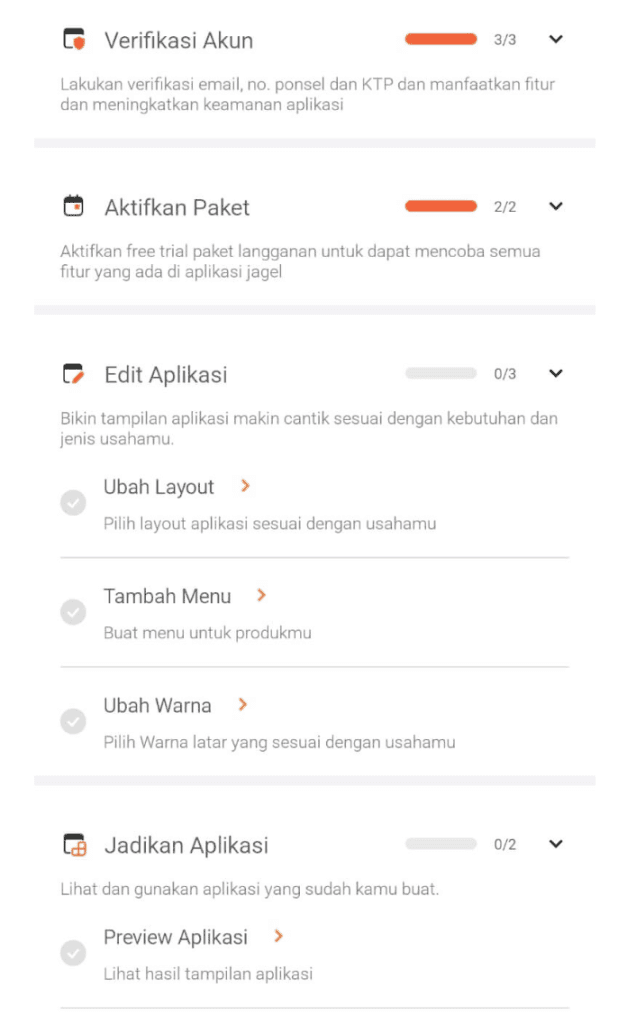
Figure 20
With full access enabled, you can now start editing your app, beginning with changing the layout.
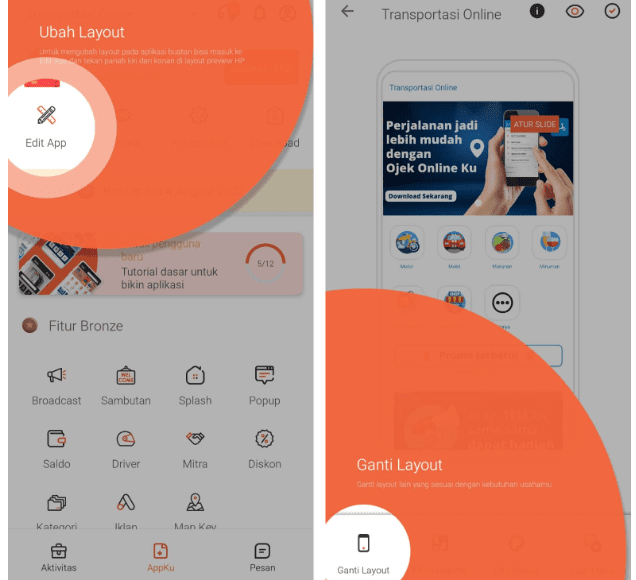
Figure 21
Tap Edit, then in the app editor select Change Layout and choose the layout that suits your app.
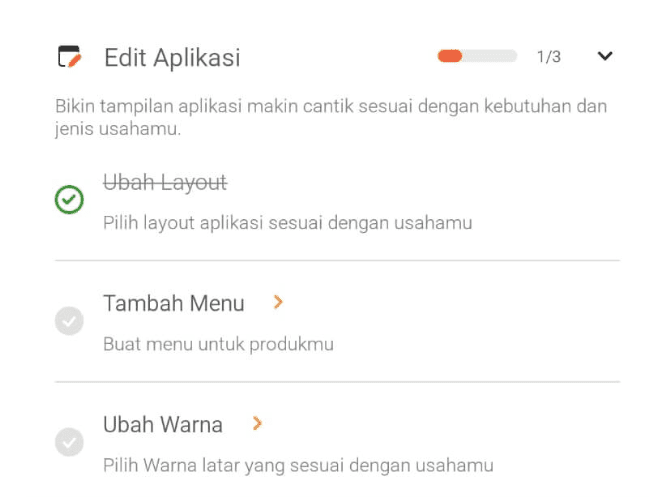
Figure 22
After changing the layout, save it and return to the guide to proceed to adding menus.
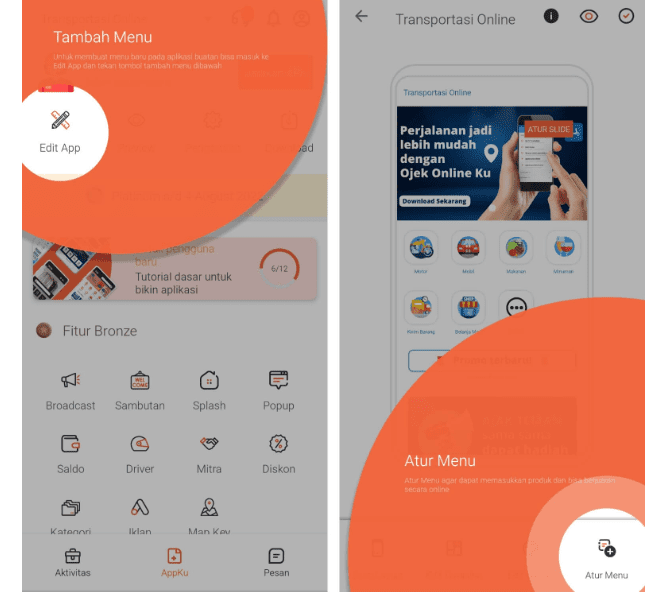
Figure 23.1
Tap Edit, then in the app editor select Manage Menu on the right.
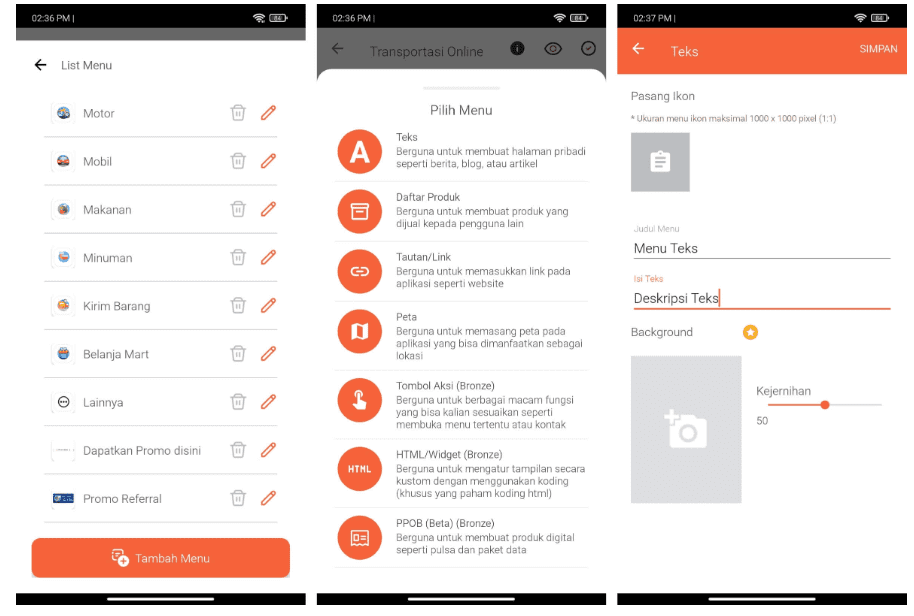
Figure 23.2
The left panel displays all existing menus. Tap [Add Menu] to create a new menu. For example, choose a text menu, enter the required information, and then save the menu.
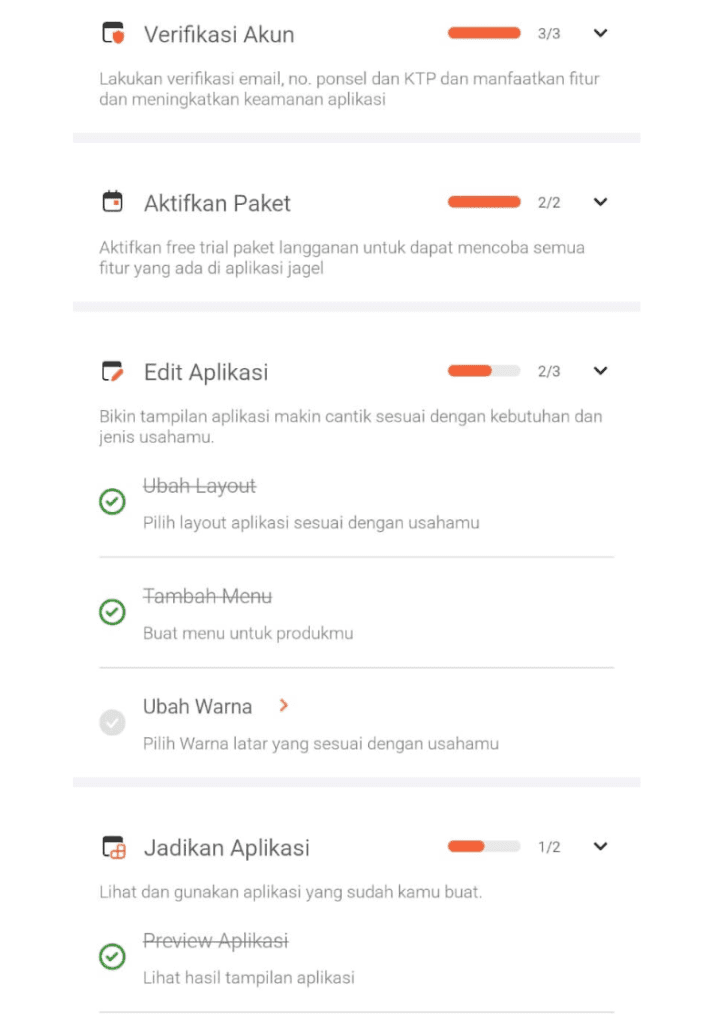
Figure 24
The final step in editing your app is changing the color scheme.
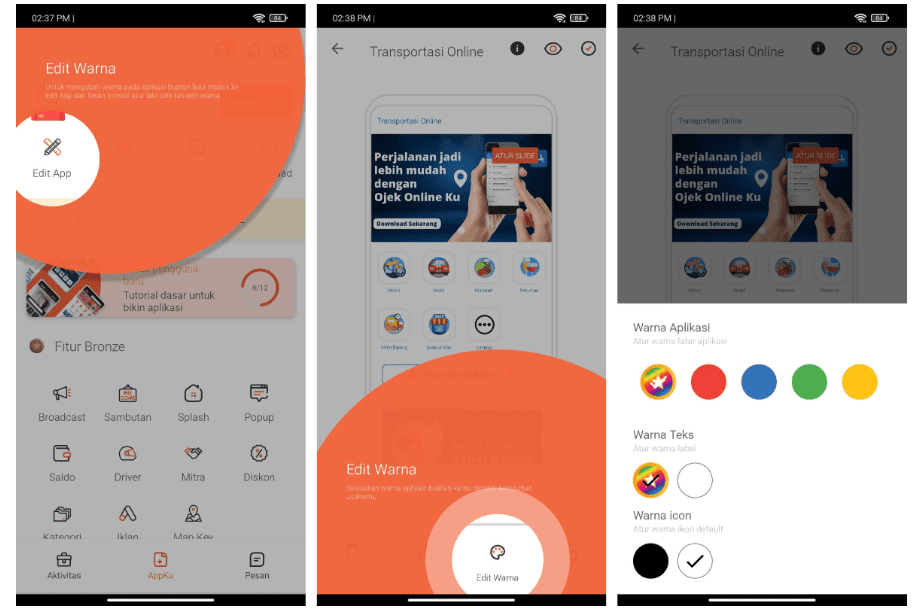
Figure 25
Tap Edit, then in the app editor select Edit Colors. Customize the background, text, and icon colors to match your app.
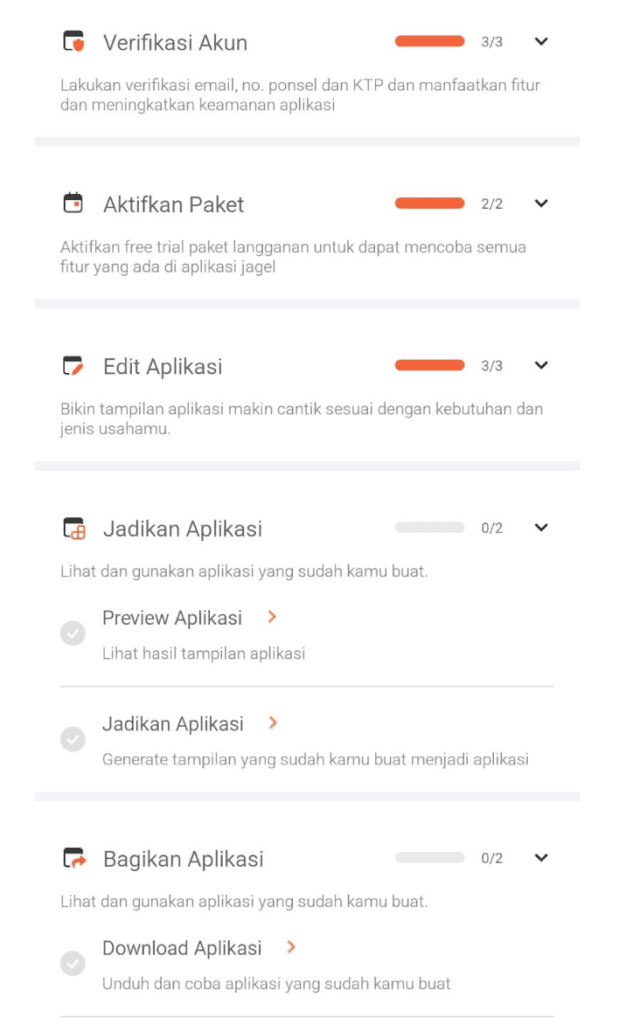
Figure 26
Next, proceed to the preparation stage to generate your app file. Before that, you can preview the app to see the results.
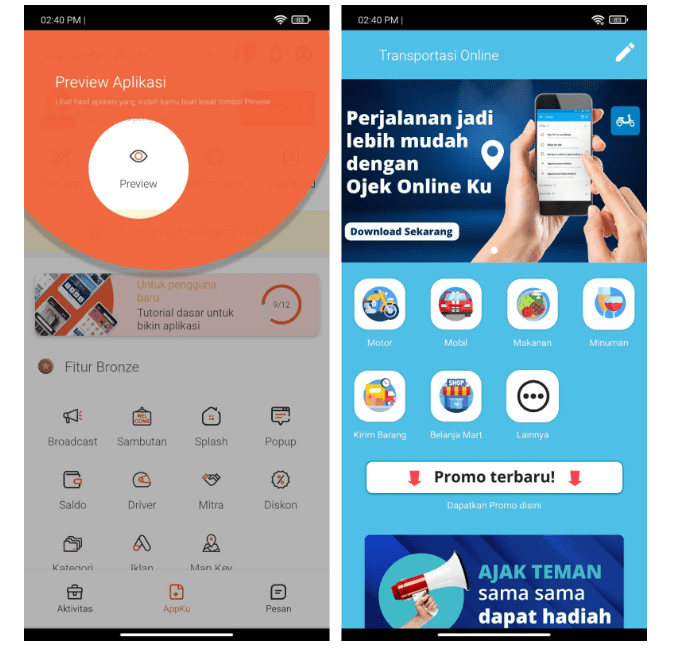
Figure 27
Tap Preview to view your app.
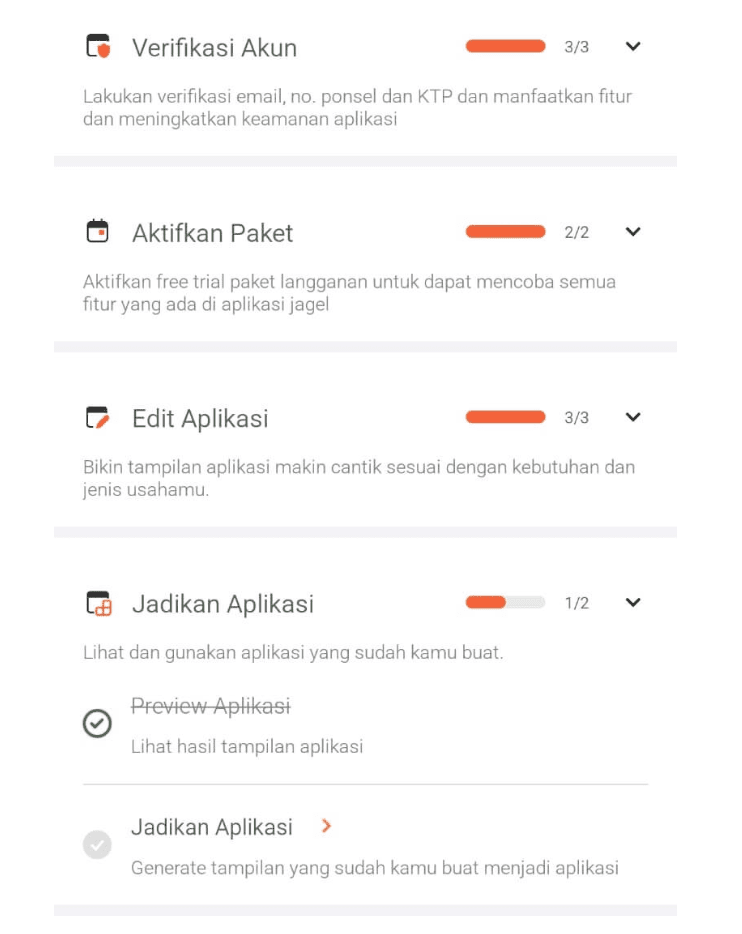
Figure 28
If the preview matches your expectations, tap Create Application.
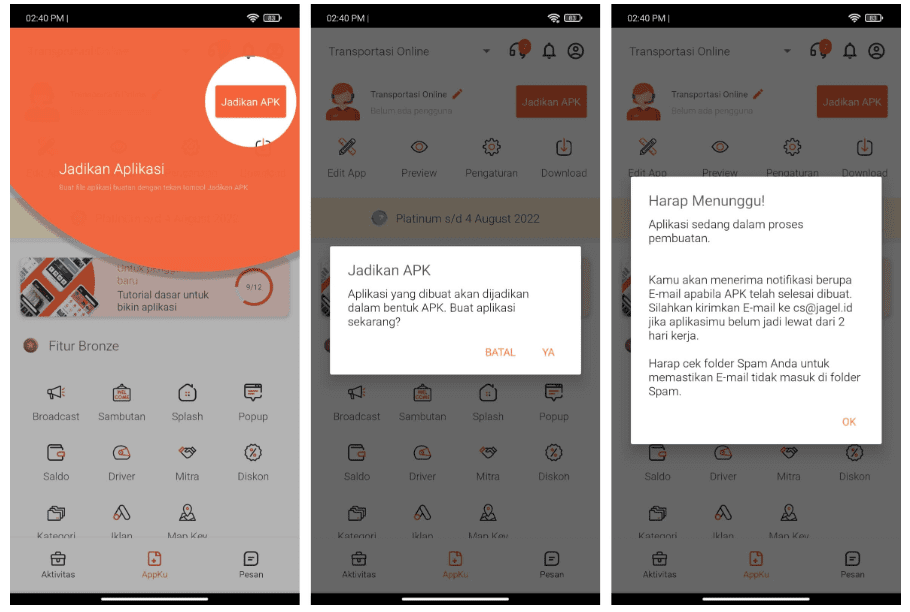
Figure 29
Tap Create APK and follow the on-screen instructions. You will receive a message from the admin once the app is ready. You can download it from My App > Download button in the top-right corner.
Create Your Own APK Easily, Affordably, and Quickly
Creating an Android application with Jagel is simple and accessible for everyone. Apps built using Jagel can also be published on the Google Play Store without additional development costs.
If you have any questions or need assistance, please contact cs@jagel.id or +62 895-1632-0900. Our support team will be happy to help.